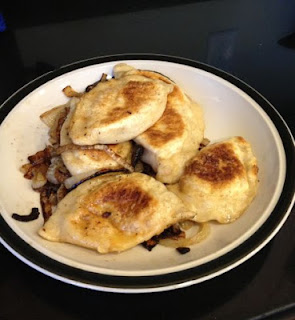
 My husband's family has a Thanksgiving tradition of making perogies and I am happy to embrace this. Perogies are dough pockets (like big ravioli) filled with cheesy mashed potatoes and sauteed with sweet onions. They are delicious!
This recipe is especially good for Thanksgiving because the work is much easier with many hands and an assembly line. I broke out the directions by assembly-line task. It's a lot of fun to be in the kitchen with loved ones! Mashed potatoes and onions can be prepared in advance, and a bread machine with a dough setting saves a lot of kneading time.
This year it was just the two of us for turkey day and my rolling pin skills aren't quite up to par, so we discovered that parchment paper keeps the pre-boiled perogies from sticking to the plate so all of the filling step can be done at once with a layer of parchment paper in between each level of perogies. Don't let them touch each other though, the potato-filled dough pockets are very very friendly with each other and tough to separate.
Additional recipe instructions involve throwing handfuls of flour at siblings, trying to eat the hot just-cooked perogies while keeping everyone else away from them, hoping to still have room for turkey later, and eating cold leftover perogies with onions on top straight from the fridge for day-after-thanksgiving breakfast and lunch.
Perogies
SPECIAL EQUIPMENT NEEDED
Perogie-maker (these can be found at kitchen gadget stores)
Heavy rolling pin
Bread machine (not a necessity but very helpful)
INGREDIENTS
Dough
6 cups flour
2 eggs
2 tsp salt
1 to 2 cups of milk
Potatoes
6 large potatoes (half russet and half yukon gold), peeled and cut up
Grated cheddar cheese - sharp white if available
1 large sweet onion, diced
Milk, to taste
Butter, to taste
Salt & Pepper (1/2 tsp salt per lb of potatoes)
Other
Extra milk in a small cup for sealing perogies
2 large sweet onions, sliced (these can be sliced and frozen in advance and used straight from the freezer)
1 to 2 sticks of butter
DIRECTIONS
1. Slice onions. These should look like a bag of smiley faces. Every good recipe should start with smiley faces.
2. Prepare mashed potatoes: Saute onion with a little butter. Boil potato pieces until fork-tender. Drain. Mash potatoes with sauteed onions, cheese, milk, butter, and salt & pepper. This should be a little saltier than one would normally make mashed potatoes for serving.
3. Make dough: Knead together all dough ingredients, starting with 1 cup of milk and adding more as needed until the dough is not crumbly and not sticky. If using a bread machine, use the dough setting. No rising cycle is needed.
4. Make circles: Using a heavy rolling pin on a lightly floured flat surface, roll out dough to about 1/4" thick. Cut out circles that are smaller than the perogie-maker using a round cookie cutter or the top of a glass. Roll these circles flatter so they are the size of the perogie-maker with a little bit hanging over the edges. They need to be thick enough to hold potatoes through boiling and frying but not so thick they won't cook through.
5. Fill perogies: Carefully lay the prepared circle of dough on the perogie-maker. Drop a spoonful of mashed potatoes in the center; it should be plump but not enough to squish out the sides. Dip a finger in milk and run along the edge, then crimp the perogie-maker together. Make sure it's sealed before moving on to the next one. Put these on a parchment-paper-lined plate *not touching each other* until there are enough to boil.
6. Boil: Fill a large stock pot about halfway with water and set to a boil. In small batches, drop in the filled doughy perogies so they have some space to float and not be on top of each other. Boil for a while until the dough is cooked through. Remove carefully from boiling water with a slotted spoon and place in a waiting area for the frying. When all are removed from the water, add the next batch.
7. Final cooking: Heat a very large frying pan with a teaspoon or two of butter. Add a handful of sliced onions and let soften for a few minutes. Add a batch of boiled perogies in a single layer on top of and in between the onions. When that side is browned, flip them over. When both sides are nicely browned, remove to a plate and try to keep everyone from eating them so some will make it to the table. The onions can stay for a batch or two depending on how cooked you want them. Add a little more butter for each batch and more handfuls of onion slices as they get cooked and moved off to the serving plate.
8. Serve and Enjoy!


